Skip to Main Content or Page Contents
HTML5 & CSS 3 Tutorial
HTML & CSS Box Model tutorial
Box model description and examples of CSS styling
This Page's Contents
HTML Box Model Introduction
Box Model Diagram
Box Model Details
HTML Box Model Introduction
Although every body calls this the Box Model it is actually a rectangle having a width & height but no depth.
All the HTML elements can be regarded as a 2 dimensional box.
The Box Model diagram shows the areas that CSS styles are applied too.
The boxes content, text and or graphic images are in the centre of the box, which can be surrounded by padding, border and margin as shown in the Box Model Diagram
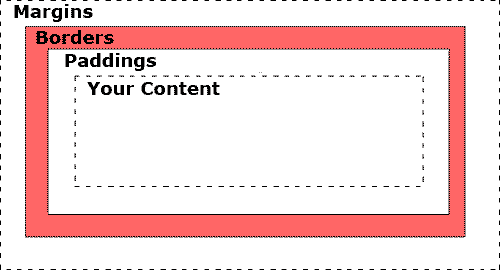
Box Model Diagram
Box Model Details
Your content
This is where your content is placed which could be:
- Text
- Image(s)
- Table(s)
- Div(s)
- Most other elements
- A combination of some or all the above
Padding
- Places a space around 'Your Content'
- Text normally requires padding if you have a border to prevent the text butting up against the border making the text harder to read.
- Graphics padding is optional depends on the desired style required
- The padding acquires the background color of the the content area
- Padding can be applied to all sides or separately applied to selected side(s) top, right, bottom and/or left
- Set padding to 0 (Zero) for no padding.
Example Set the padding to 5 pixels on all 4 sides
p {padding 5px)
Set the padding to different sizes on all 4 sides
p {padding-top: 10px; padding-right: 20px; padding-bottom: 30px; padding-left: 40px;}
Shorthand version of above
p {padding: 10px 20px 30px 40px;}
Note the spaces & no punctuation between the size units
Set Top & bottom to 10 pixels, &, right & left to 20 pixels
p {padding: 10px 20px;}
Set Top to 10 pixels, right & left to 20 pixels, bottom to 30 pixels
p {padding: 10px 20px 30px;}
Border
- The border surround the padding and content.
- There are various styles for Borders
- The border can be applied to all sides or separately applied to selected side(s) top, right, bottom and/or left
- Set width to 0 (Zero) for no Border
Margin
If required:
- The Margin applies a space outside of the Border, it is outside the actual element.
- The margin does not have a background color, it is completely transparent and shows the background colour of the underling element, such as the body element
- The border can be applied to all sides or separately applied to selected side(s)- top, right, bottom and/or left
- Set to 0 for no Margin
- Positive or Negative margins can be applied
- A Negative top or left margin applied to a static element moves the element in that direction
- A Negative bottom or right margin applied to a static element moves the following element towards the original element
- A static element is an element with no float applied
- A Negative margin can create Overlap of Elements with dramatic effect
- Negative margins are valid but some designers think they should not be used other think they are great.
The margin does not have a background color, it is completely transparent and shows the background colour of the underling element, such as the body element
Widths Heights
The CSS width & height attributes are applied to 'Your Contents' ONLY
The overall width is the combined width of:
Your Contents width +
2 padding widths +
2 borders widths +
2 margin widths
The overall height is the combined width of:
Your Contents height +
2 padding heights +
2 borders heighst +
2 margin heights
This is rather ackwardAlways declare a DOCTYPE for this to be true in IE.
Box Model Code Example
<!DOCTYPE >
<html lang="en">
<head>
<meta charset="UTF-8">
<title>CSS Box Model Example</title>
<style type="text/css">
.example1 {
width:220px;
background-color: yellow;
padding:0px;
border:0px;
margin:0px; }
.example2 {
width:220px;
background-color: yellow;
padding:10px;
border:5px solid black;
margin:40px; }
.example3 {
width:220px;
padding:0px 4px 40px 100px;
margin: -28px 0 -10px 100px;
background: #FF0;
border-top: 1px solid #000;
border-right: 4px dashed #900;
border-bottom: 8px double #60F;
border-left: 16px inset #6F3; }
</style>
</head>
<body>
<h1>Box Model Example</h1>
<hr style="width: 100%; height: 1px;">
<p class="example1">My Content Example 1</p>
<hr style="width: 100%; height: 1px; color: blue;">
<p class="example2">My Content Example 2</p>
<hr style="width: 100%; height: 1px; color:red;">
<p class="example3">My Content Example 3</p>
<hr style="width: 100%; height: 1px; color:green;">
<p> </p>
<p>Click for <a href="../../css/css-box-model.htm">Details of Box Model Example</a></p>
</body>
</html>
View this code in a browser Leave the view window open and follow the explanation below
Examples of the box model
The above code displays 3 example of how styling the padding, borders & margins affect the appearance of the box model.
- The 3 examples have the same content except for the number
- 4 Horizontal lines have been placed in the Example to help demonstrate the effect of the margins.
Example 1
There is no styling for the padding, borders & margins which are set to 0 (zero)
Example 2
Padding set to 10
Borders set to a width of 5 pixels, solid style and coloured black
Margins are set to 40 pixels
Example 3
Padding
Padding - different amounts of padding were set to each side.
These could be set as follows:
padding-top: 0;
padding-right: 4px;
padding-bottom: 40px;
padding-left: 100px;
I used a shorthand code version:
padding:0px 4px 40px 100px;
Sides are set in a clockwise direction starting at the top:
ie.
0 top padding
Margin
The margins were set with shorthand code in the orders of top, right, bottom & left margins:
margin: -28px 0 -10px 100px;
- The margin is the space outside the border or where the border would be if there is no border.
- Note 2 negative numbers have been entered.
- The margin-top: -28px has moved the My Content Example 3 box upwards so that it overlaps the Horizontal line that precedes it.
- The margin-top: -10px has allowed the Horizontal line that follow the My Content Example 3 box to touch the bottom of the box. A larger negative such as -20 would have allowed the line to move higher & overlap the My Content Example 3 box.
CSS Box Sizing Property
Programs
Video Editor
Filmora 10 Video Editor
Hosting & Domains
Hostgator
This site is hosted on Hostgator
123 Reg
Bluehost
Anti Virus Software
Kaspersky
Norton
AVG
Web Site Templates

DVD Tutorials
Books
CSS: The Missing Manual
CSS Pocket Reference
Html5 and Css3 All-In-One for Dummies
Web Design
Build Your First Website In Simple Steps
Responsive Web Design with HTML5 and CSS3